Published byendless on 2007-05-16 Category: Controller | Page Views: 8847
Well, I had done the controller led swap, and had a bunch of left over smds. I knew the center led on the ring of lights was the same size as the controllers smd. So I went ahead and changed it out.
Steps:
1. Tear apart your 360
2. Remove the Rf Board
3. Replace Smd
Required Tools:
1. Favored 360 tools for opening case
2. Torc T9 Star Driver
3. Soldering Iron + Solder
4. Smd (color of choice can be found here from http://www.unique-leds.com from 22-25 cents a piece)
5. Pair of tweezers, for putting the led down, and holding it in place while you soldering it in.
Lets get started
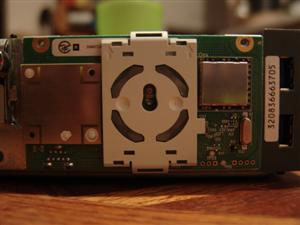
Open your case, and on the front you will see the rf board.
The white plastic cover is removable, pull on the top and it will pop off revealing the 3rd screw you will have to remove. Remove the 3 screws and rf board will come out.
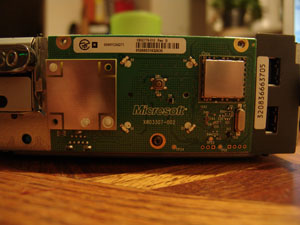
Now comes the fun part, desoldering the smd, and replacing it.
Watch the video, its the best way to understand how to remove them Video This is from http://llamma.com
They do this by placing a small amount of solder over the led, and swiping it to the side with their soldering iron. Clean up any solder that is left behind, and you will see the two contact pads, sometimes they like to be a little pointy after you remove the led. Go ahead and touch the soldering iron onto them and they will flatten out, making it a whole lot easier to tack it back down.
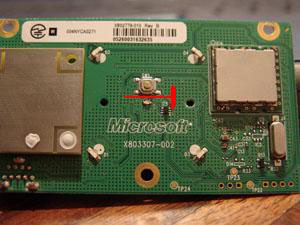
Now when you remove the led, look at the bottom of your replacement led, you will see a triangle point > or a -|. This is how you know where your negative is, it will be pointing towards negative. View this picture to see where your negative will be.
Place your led on top of the two contact points, what I do is tack one side down at a time. When I finish my first tack, I hold down on the led with the tweezers, and tack the other side down. This puts the led flush on the board, and improves the contact.
Once you have done this, put the rf unit back on your 360, plug your 360 in and press the power button. If your light comes on you know your contacts are good, and your ready to put your 360 back together. If it isnt however, check your connections, if they look good, what I do is put a very small amount of solder on both sides. When you do that, check again, if its still not lighting up, remove the led, and try it again. Make sure your led is pointing towards ground.
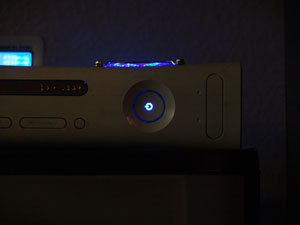
And heres the final picture of what your mod should look like once completed.