Published bytmbinc on 2009-09-08 Category: Technical | Page Views: 293682
Introduction
This tutorial has detailed technical information from various sources including xbox-hacker.net and free60.net and will explain in great detail how to run homebrew code for the xbox 360. It is important to note this is the first stage of being able to run xbox 360 homebrew via the known exploit.
THE GOAL
There is a new hack which can boot homebrew code in less than 5 seconds. See
at the end of this document for a description how the hack works. For now,
all we need to know is that this is a new way to exploit the well-known 4532
kernel, in a way which also works on updated machines, unless they have been
updated by the summer '09 update. It also works on all hardware types.
This document is a technical description meant for people who want to
undestand the hack. If you don't understand a word, calm down - there
probably will be future releaes, howtos etc.
Please also notice that from a functional side, the result will be the same
as the KK-hack; it's just must faster, works on more hardware and is more
reliable. So it replaces the KK-hack, not less and not more.
HOWTO
First, determine your kernel version. This hack has been verified to work
until the 849x-update (summer 09).
Determine your hardware type, which is either a Xenon (no HDMI), Zephyr
(HDMI, but 90nmCPU/80nm GPU), Falcon/Opus (60nm CPU) or Jasper (new
Southbridge, 60nm GPU, 60nm CPU).
You need some files, which are not part of this package. We are still
working on proper, legal ways to obtain these files, for example by
obtaining them from files you already have (like a NAND backup).
What You need
- A suitable "CB/CD pack". This is a part of the bootloader, and you need a
specific version for your hardware type:
(Especially on Xenon, you might be able to use an older version, too. But
the newest one will work in any case.)
- A hacked SMC code, *for your hardware type*.
- Either a Microcontroller doing the JTAG stuff, or a hacked SMC with JTAG
code.
- The 4532 kernel update, extracted (you need the xboxupd.bin)
- A binutils cross toolchain to target the ppc64 arch
- A compiled payload, like XeLL
- A possibility to reprogram the NAND flash. You can use an external
programmer, a SPI programmer (which will be released soon), or some
dedicated hardware.
Building a suitable image
In order to produce an image suitable for the attack, let's reconsider what
we need:
- A patches SMC firmware, which starts the CMD 07 "READ SECTOR(S) DMA" at
the right time. Note that you need to use the right SMC based on your
machine type. Yes, they are all different. Running a pre-jasper code on a
jasper-southbridge is particulary difficult to recover from. Be warned.
- A microcontroller firmware which does the JTAG thing, implemented as a
SMC patch.
- A 2BL/4BL combination suitable for your machine type, with version 1920
or up.
- The 5BL (1888 base kernel), which is always the same binary.
- The 4532 (or 4548) patch, extracted from the 4532/4548 system update.
- An SMC config block, which stores some boring SMC-related data.
- Our exploit buffer, which is DMA'ed into the kernel/HV
- The code we want to run (XeLL, for example)
The build_image.py can build a flashrom image if you give it the right
items.
where
- image_backup.bin is your original nand content,
- C{B,D}.1920 are a suitable 2BL/4BL, in decrypted form
- 4532_upd.bin is the xboxupd.bin from the 4532 update,
- xell-1c.bin and xell-backup.bin are XeLLs linked to 0x01c00000
- smc_hacked.bin is the SMC with the hacked read rtc handler (and possibly
also the jtag stuff)
Multiple parts of the image will be generated in the output-directory. You
need to flash them all, at the proper positions.
Flash this images into the 360 NAND flash. Needless to say, MAKE AN UPDATE
FIRST! Also, remove R6T3! There is code out which can burn fuses, and
potentially render boxes unusable. By removing R6T3, this won't be an issue
anymore. Add the 3 resistors if you want to use the SMC-based JTAG hack.
Connect a VGA cable, and power on the box. If you're greeted with a blue
XeLL screen, then congratulations, everything is fine! Have fun!
SMC GPIOs
So we need some hardware which uses JTAG to set the DMA target address soon
in the bootup sequence, as long as JTAG still works. We started using an
external microcontroller, but we already HAVE an on-board microcontroller -
the SMC! There are some leftover GPIO ports, which are - at least on
Xenon-boards - easily accessible on the left. They operate at 3.3V, so we
need some resistors to handle the 1.8V logic level of the GPU.
Zephyr and up don't have so many GPIOs available anymore, but don't
worry, we found a solution there, too.
In case you are using the hacked SMC with the GPIO, please use 330 Ohm
resistors to connect
How does this all work?
To understand this new hack, let's first look at what made the KK exploit
possible: A fatal bug in the Hypervisor's Syscall Handler, introduced in the
4532 kernel update. For more details, take a look at
http://www.securityfocus.com/archive/1/461489/30/0/threaded which explains
the problem in great detail.
The KK exploit exploited the kernel bug by modifying an unsigned shader to
do a series of so-called memory exports, an operation where the GPU can
write the results of a pixel or vertex shader into physical memory. The
shader was written to overwrite the Idle-thread context to make the kernel
jump at a certain position in memory, with some registers under our control.
In order to control all registers, a second step was necessary, this time by
jumping into the interrupt restore handler. This finally allows all
CPU general purpose registers to be filled with determined values. The
program counter could be restored to a syscall instruction in the kernel,
with register values prefilled so that they would trigger the exploit.
The exploit basically allows jumping into any 32-bit address in hypervisor space.
To jump into an arbitrary location, we just used a "mtctr, bctr"-register
pair in hypervisor, which would redirect execution flow into any 64-bit
address. This is important, since we need to clear the upper 32bit (i.e.,
set the MSB to disable the HRMO), since the code we want to jump to is in
unencrypted memory.
This code would usually load a second-stage loader, for example XeLL, into
memory, and start it. XeLL would then attempt to catch all cpu threads
(because just the primary thread is affected by our exploit), and load the
user code, for example from DVD.
So, the following memory areas are involved:
- Idle Thread context, at 00130360 in physical memory
This stores the stack pointer (and some other stuff) when the idle thread
was suspended. By changing the stack pointer, and then waiting for the
kernel to switch to the idle thread, the stack pointer can be brought into
our control. Part of the context switch is also a context restore, based on
the new stack pointer.
- Context restore, part 1, arbitrary location, KK expl. uses 80130AF0
The thread-context restore doesn't restore all registers, but let's us
control the NIP (the "next instruction" pointer). We setup NIP to point to
the interrupt context restore, which does a SP-relative load of most
registers.
- Context restore, part 2, same base location as part 1
We just re-use the same stack pointer, because the areas where the first
context restore and the interrupt context restore load from do not overlap.
The second context restore allows us to pre-set all registers with arbitrary
64 bit values.
- The HV offset, at 00002080 for syscall 0x46 on 4532
Because of the HV bug, we can write this offset into unencrypted memory,
giving us the possibility to jump into any location in the hypervisor space
(i.e. with a certain "encryption prefix"). We usually write 00000350 here,
which points to a "mtctr %r4; bctr" instruction pair in hypervisor, which
lets us jump to %r4.
- Our loader code, at an arbitrary location
This code will be executed from hypervisor. It's the first of our code which
will be executed. %r4 on the syscall entry has to point to this code.
Only the the idle thread context and the HV offset have fixed addresses.
It's easily possible to merge this so that only two distinct blocks needs to
be written into memory, but it's not possible to merge this into a single
block.
Fortunately, the NAND controller allows doing DMA reads where the payload
data is split from the "ECC"-data. Each page has 512 bytes of payload, and
16 bytes of ECC data. Thus, a single DMA read can be used to load all
required memory addresses. We chose the Payload to read the Idle Thread
Context, the Context Restores and the loader code. The ECC data will carry
the HV offset.
To to a DMA read, the following NAND registers need to be written:
ea00c01c Address for Payload
ea00c020 Adresss for ECC
ea00c00c address inside NAND
ea00c008 command: read DMA (07)
The System Management Controller (SMC) is a 8051 core inside the
Southbridge. It manages the power sequencing, and is always active when the
Xbox 360 has (standby or full) power applied. It controls the frontpanel
buttons, has a Realtime clock, decodes IR, controls temperatures and fans
and the DVDROM tray. It talks with the frontpanel board to set the LEDs.
When the system is running, the kernel can communicate with the SMC, for
example to query the realtime clock, open the dvd-tray etc. This happens
over a bidirectional FIFO (at ea001080 / ea001090). See the XeLL SMC code
for details.
The SMC can read the NAND, because it requires access to a special NAND page
which contains a SMC config block. This block contains calibration
information for the thermal diodes, and the thermal targets etc. The 8051
core has access to NAND registers, which are mapped into the 8051 SFRs. It
uses the same protocol as the kernel uses, so it writes an address, does a
"READ" command, and then reads the data out of the "DATA" registers.
It could also do a "READ (DMA)"-command. So by hacking the SMC, we could
make the box do the exploit, without any shader - the SMC can access the NAND
controller all the time, even when the kernel is running (though it will
likely interfere with the kernel). So, just we just trigger the DMA read
when the kernel has been loaded, and everything is fine.
Right?
Well, that would be too easy. While most NAND registers are mapped, tyhe DMA
address registers (1c, 20) are not. We can DMA, but only to the default
address of zero (or wherever the kernel last DMAed into). Fail.
The GPU, the (H)ANA (the "scaler" - which in fact doesn't scale at all, it's
"just" a set of DACs, and, since Zephyr, a DVI/HDMI encoder), the
Southbridge and the CPU have their JTAG ports exposed on the board. They are
unpopulated headers, but the signals are there. CPU JTAG is a different
(complex) story, and SB JTAG doesn't offset much funcationality. ANA JTAG is
boring since the ANA doesn't sit on any interesting bus. That leaves GPU
JTAG.
GPU JTAG was reverse-engineered until a point where arbitrary PCI writes are
possible, up to a certain point. So that makes it possible to talk to each
PCI device in the system, including the NAND controller. So we can simply
use THAT instead of the SMC to start the DMA?
Right?
Well, not quite. The problem is that the "VM code", the code which does a
lot of system initialization, like the memory (that code is also responsible
for generating the 01xx "RROD"-Errors), sets a certain bit in some GPU
register, which disables the JTAG interface. The VM code is executed way
before the kernel is active. So this is fail, too.
But the combination works - by programming the DMA target address via JTAG,
and launching the attack via SMC. The attack can be launched as soon as the
kernel is running, and quite early, it does query the SMC for the RTC. We
abuse this call to start the attack instead, which is a perfect point for
us.
But how do we run an exploitable kernel at all? Most machines are updated
already. Let me refresh your knowledge about the boot process again:
1BL (Bootrom)
Buried deep inside the CPU die, this ~32kb of ROM code is responsible for
reading the 2BL from NAND-flash and decrypts it into the embedded SRAM in the
CPU. It verifies the hash of the decrypted image with a signed block at the
beginning of the 2BL, and will stop execution of this hash mismatches. This
code also contains a number of test functions, which can be activated by
pulling the 5 "POST IN"-pins, which are available on the backside of the
PCB. None of these tests looks particulary interesting (from an exploitation
perspective) - they mostly seem to be related to the FSB (the bus between
CPU and GPU). This code is fixed, and all systems use identical code here.
2BL ("CB")
This code is usually located at 0x8000 in NAND flash. It's decrypted by 1BL,
and runs from internal SRAM.
It does a basic hardware initialization, and contains the "fuse check code",
which verifies the "2BL version". The fuses store the expected version.
The 2BL stores a "Version" and a "AllowedMask" (=bitfield), and
this is usually stored at address 0x3B1 / 0x3B2..0x3B3.
It then verifies the pairing information stored in the 2BL header. Part of
this verification is a checksum check of the NAND area which was used to
load the SMC code from.
It also contains a virtual machine and some
code to run on this machine. The virtual machine code, which is pretty
complicated, does the following things:
- Initialisation of the PCI-Bridge
- Disable the GPU PCIE JTAG test port
- initialize the serial port
- talk to the SMC to clear the "handshake"-bit
- initialize memory
- hopefully not: generate RROD if memory init fails
After that, the external (512MB) memory will be initialized and usable. 2BL
then decrypts the 4BL into this memory. Memory encryption will already be
enabled - no executable code is *ever* written unencrypted.
4BL ("CD")
This code is responsible for checking and unpacking 5BL, as well as applying
update patches. First, the fuses are read to determine the console "Update
Sequence", a number which basically counts the number of updates installed.
Since updates are, in the same way as 2BL, paired to a console, this allows
to configure the console in a way that no old update will be used. So each
update slot stores the maximum value of burned fuses (well, essentially the
exact value). The base kernel also has an associated value, usually zero,
but this can be changed in the 2BL pairing data block. This is what the
timing-attack increments, in order to revert to the 1888 kernel.
5BL ("HV/Kernel")
The HV and kernel are merged into a single image, which is compressed with a
proprietary algorithm (LDIC).
6BL ("CF"), 7BL ("CG")
This is part of a system upgrade. Each console has a so-called "Base
Kernel", which is the 1888 kernel which was available on launch back in
2005. Then there are two "update slots" - areas of 64k each (128k on
Jasper), which contain a 6BL and 7BL. 6BL is code which applies the
update, using a clever delta-compression. 7BL is the actual delta-compressed
update, essentially a binary diff.
Oh, updates are >64k. So only the first 64k are actually stored in the
update slots, the rest is stored in the filesystem as a special file. Since
6BL doesn't contain a filesystem parser, a blockmap is added in 6BL which
points to the sectors which contain the rest of the update.
Zero-Pairing
Now there is a special situation: If the 2BL pairing block is all-zero, the
pairing block will not be checked. However, a bit is set so that the kernel
doesn't boot the dashboard binary, but a special binary called
"MfgBootLauncher", where "Mfg" probably stands for "Manufacturing". So this
is a leftover of the production process, where the flash image is used on
all hardware, probably also before any CPU-key has been programmed.
By abusing this feature, this allows us easily to produce a flash image
which runs on all hardware. However, 4BL won't look at update slots when it
detects this mode, so we end up in the 1888 base kernel. And we can't run
the dashboard, so it's impossible to escape this mode.
Previously, this has been deemed very uninteresting, because first the 1888
isn't exploitable by the KK exploit, and second because it's impossible to
run the KK game anyway.
However, starting with 2BL version 1920, an interesting thing happened:
The encryption key for 4BL is generated with the help of the CPU-key now.
That means that without the CPU-key, it's not possible to decrypt the 4BL
anymore. Note that each 2BL has exactly a single valid 4BL binary - 2BL
contains a hardcoded hash for the 4BL, and doesn't use RSA.
However, zero'ed pairing data is detected, the CPU-key is NOT used in this
process, like it was previously. That also means that you cannot just zero-out
the pairing data anymore - the 4BL would be decrypted with the wrong key
then. Instead you need to decrypt the 4BL (which requires knowing the CPU
key), and re-encrypt it with the old algorithm.
However, 1920 was suspecible to the timing attack - so a CPU-key recovery
was possible on one console, which allowed us to decrypt the 1920 4BL. That
4BL shows a very intersting change: Whenever zero-pairing is detected, the
update slots are not ignored anymore. Instead, if the update-slots are
zero-paired as well, they are applied.
This change allows us to boot any kernel, provided we have a (1920 and up)
2BL/4BL set which runs on that machine. This is very important, because we
can build up an image now which runs into the 4532 kernel, regardless on how
many update fuses are set. However, the 2BL revocation process must be
passed, so we are not completely independent of the fuses, still. But since
we use zero-pairing, the SMC hash doesn't matter anymore (there are other
ways to work around the SMC hash problem, like the TA, but we get this for
free). Still, we boot into the MfgBootLauncher (into the 4532 version now,
which does a red/green blinking thingie - you'll notice once you see it,
it's very unique and doesn't look like any RROD or so). But thanks to the
SMC/JTAG hack described above, this allows us to launch our attack from this
state.
Newer consoles (which have the TA fix) don't run 1920 anymore. They run, for
example, 1921. The problem is that we cannot run HV code on these machines,
so we don't know the CPU key. However, when comparing the 1921 and 1920 2BL
(which we can still decrypt), the only change is the addition of the timing
attack fix (i.e. replacing two memcmp instances with a memdiff function).
Also, we know the expected hash value of the decrypted 4BL. Based on a 1920
4BL, and the guess what has changed functionally, and the new size of the
4BL, we were able to guess the modifications, which yields an image which
passes the 2BL hash check. Note that this is not a hash collision - we did
merely derive the exact image by applying the changes between 1920 2BL and 1921
2BL into 1920 4BL, yielding the 1921 4BL.
The 1921 2BL theoretically runs on all machines so far, even TA-proof ones.
But it crashes on Zephyr, Falcon and Jasper. The reason is the VM code,
which doesn't cover the different GPUs (Xenon has 90nm GPU, Zephyr and
Falcon have 80nm, Jasper has 60nm, so there are 3 GPU revisions in total).
But the step from 1921 to, say, 4558, is even smaller. It's just the
different version number, plus a slight difference in the memcpy code, which
again can be ported over from 2BL.
Jasper's 67xx is a different thing, since this code adds support for the
largeblock flash used in "Arcade"-Jasper units. We have used some magic to
retrieve this code.
So we now have ALL 4BL versions. Isn't that great? It means that ALL
machines can run the 4532 kernel. The good news is also that the 4532 kernel
supports falcon consoles, and runs long enough to also work on jasper
consoles (because we exploit way before the different GPU is touched at
all).
Troubleshooting
Q: "The power supply goes red when plugging in power!"
A: You shorted a power pin, probably V33_SB, the one attached to the NAND
flash. Carefully look for solder residues. Use a lot of flux and a
properly-heated soldering iron.
Q: "The power supply stays yellow when I press the power button, and nothing
else happens."
A: The SMC code is invalid. This can be a misconnected flashrom, an illegal
image, a bad flash or simply a bad SMC code.
Verify:
- Electrical connections first.
- Did you flash with the proper ECC settings? The flash images we are
working with usually contain raw ECC information, i.e. 512+16 bytes per
sector. Make sure your flash programmer is not modifying these 16
bytes, but writing those as they are.
- Have you used the right SMC image?
Q: "The fans run at full speed immediately."
A: This is very likely a bad SMC config sector. Did you flash all the parts
generated by the image creation tool at the proper position?
Note that offsets are given as payload offsets, not counting ECC bytes.
Usually this matches what your average NAND programmer tells you, but in
case you re-assembled these into a single image, take care to properly
convert the offsets.
Q: "I get E79"
A: This means that, congratulations, your console is still booting into a
kernel, and just cannot go further (which was to be exepcted, given that
there is no filesystem anymore).
You're almost there, but for some reasons, the DMA attack didn't run.
This can be either that you didn't used a patched SMC, or that the target
address wasn't inserted properly.
Q: "Console powers on, but I get a black screen."
A: Well, there are many reasons here again. First, wait some time (~1
minute), and see if you get a RROD. If you do, the VM code failed to
handshake with the SMC (error code XXXX), which usually means that it
crashed, and the SMC watchdog triggered until it retried too often.
Did you use the proper 2BL/4BL image for your machine type? Did you use a
recent enough SMC version? Since the VM code took more and more time
(from roughly a half second in 1888 to several seconds in 1920), the SMC
code was modified to time out later. Be sure to use a known-good SMC
version, if possible, based on the version which was installed before.
If you don't get a RROD, please try checking your POST code. You can do
this via CPU jtag, or by measuring the 8 POST pins.
Post code 6C:
The exploit failed, somehow.
Post code 10:
Our code is running! That's great, but it failed copying the XeLL-payload
from flash. Try booting into the alternate loader (see below in the
"exploit loader" section), or reflash.
Post code 11:
Exploit code ran, and jumped into XeLL. XeLL crashed. Try alternate
loader, or do serial upload for recovery, if you really screwed up both the
primary and secondary loader. (You failed, in that case.)
Post codes >= 0x80:
Those are errors from the bootloader. Please check the disassembly of
those loaders to see what's wrong exactly. It shouldn't happen unless you
have a bad flash.
Post code 0xA0:
Your 2BL didn't want to run on your hardware due to the 2BL revocation
fuses. Use a more recent 2BL/4BL set for your hardware. If you're already
running {1921, 4558, 5770, 6712} then you're out of luck. Your box was
already updated to a newer 2BL, which likely fixed what we used to
exploit. Restore R6T3, restore the flash image, and use this console for
playing games. Get another console, and try again.
Please note that some hardware elements are not properly initialized at the
early time of the exploit. This affects:
CPU:
- The CPU is initialized in low-power mode, where it runs at quarter-speed.
Setting the CPU power mode is possible, of course, but needs to be
reverse-engineered from the corresponding hypervisor syscall.
GPU:
- A full screen setup is required, including the programming of the
ANA-chip. Code is available for setting up a 640x480 VGA mode, support
for other resolutions needs to be added.
- EDRAM must be "trained". This is what fails when the E-74 error is
displayed. The code is rather complex, and has been
reverse-enginnered, but doesn't run properly yet. However, it has been
shown to work a bit, and can likely be tweaked to work properly.
SATA:
- SATA likely needs some reset sequence. Linux kernel does this fine, but
XeLL doesn't work.
All of these issues are expected to be fixed.
This hack can also be used to reboot into a Microsoft kernel, in order to keep the
possibility of playing games locally. This is not within the scope of this
document, and is actually not related to this hack at all. This hack allows
you the execution of software - and YOU decide what software that should be.
It could be linux, your favourite emulator, or a rebooter.
Note that we do not support patching the Microsoft kernel for piracy
under any circumstances. Also, playing on LIVE with a modified console
won't be possible without getting banned, ever. There are already
challenges in place which detect any unauthorized modification. We urge you
to not abuse this hack for piracy.
EXPLOIT LOADER
The first own code which is executed is a small loader, which operates in
the following way:
- If a character is present on the serial port, it will be read.
- if that character is '@', we will enter serial upload mode.
- if that character is ' ', we will use the backup bootloader
- if not serial upload mode:
- POST 0x10
- read bootloader from flash (either backup or normal)
- POST 0x11
- run
- serial upload mode:
- output '>'
- receive characters
- after 10 consecutive 'x', stop upload
- output '!'
- run
This allows some kind of recovery if you want to update the in-flash
bootloader.
The used addresses are the following:
FLASH_BASE is the location in flash of the backup bootloader,
FLASH_BASE + 0x40000 is the location of the main bootloader,
CODE_BASE is the memory address of the bootloader in ram.
A lot. First, thanks to all of you which have been working on Xbox 360
reverse engineering. Thanks to everybody involved in technical discussions
on xboxhacker.net.
(in order of appearance)
recovery of CB1920 by robinsod,
initial JTAG reverse enginneering by tmbinc,
getting importants facts straight by SeventhSon,
first description of how it worked out by Martin_sw,
SMC JTAG code, lots of testing and debugging by Tiros
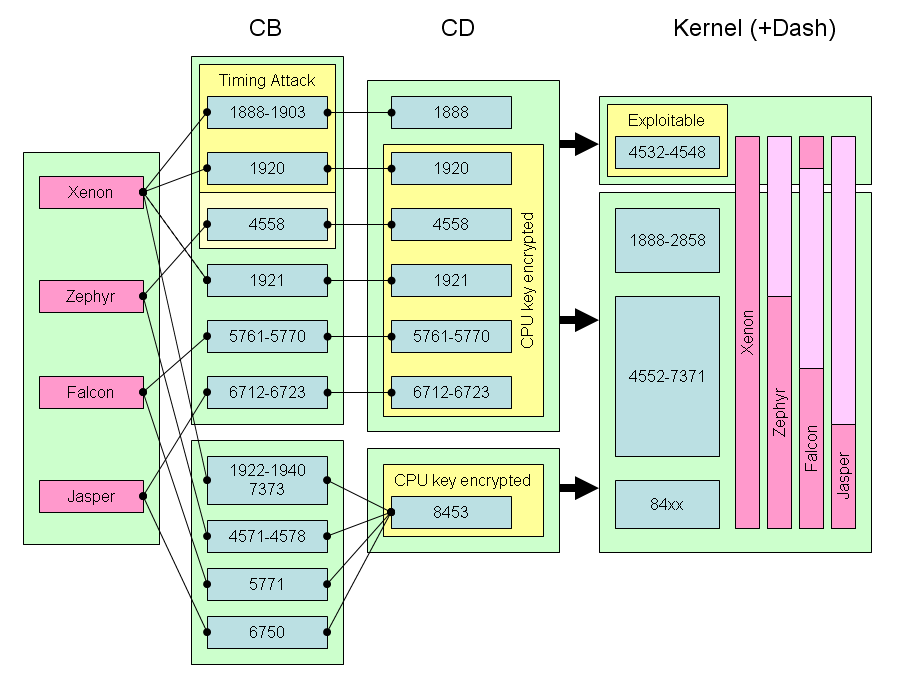
Diagram of CB/CD/Kernel/HW(Attackable/Exploitable/Compatible)
Since there are quite a few combinations of hardware and Cx-sections that are (or are not) attackable/exploitable/compatible I thought I try to make a diagram of it.
I'm sure it isn't complete or fully correct yet, but it's a start. Here is a picture: