Published byrs6_n2o on 2006-03-26 Category: Hardware Add-ons/Mods | Page Views: 17812
Ok, before we start we need to make sure that you have used a soldering
iron before and you are pretty good at it. if not then pay me some money
and ill do it for you lol. next thing is the supplies.
Supplies Required
1. 0603 surface mount LEDs (you can get them at LLAMMA.COM)
2. Torx 8 screwdriver
3. Soldering iron
4. Some solder
5. Tweezers
6. Patience
now the fun begins muahahahah!!!!
Preparation
First you have to unscrew the 7 screws. easy? not quite my friends.
unlesss you got a screwdriver with a small hole in the center of it, you
will need to make some modifications. if you can, drill a hole in the
center of the driver.
This is kinda hard since its so damn small. what i did is i took a
dremel and i just filed down the center of the screwdriver so the little
thing in the screw didnt stop me from taking the screws out. once your
screwdriver is working go ahead and take out the six visible screws and
theres one behind the battery under the barcode. when you unscrewed them all proceed to the next step.
Once all the screws are gone, take off the bottom half of the controller. You will see the vibrating things attatched to the board. Simply unplug them and place em someplace safe. now remove the board from the top piece.
You will notice that the LEDs are *****ing tiny and wonder how you'll get
them out. Taking them out isn't that hard.
Take out your soldering iron and some solder. Now take a little solder and melt it over each of the LEDs. Then use the iron to melt the solder and quickly take the LED out. Then do it again for the other LEDs. Once you get all the LEDs out proceed to the next step.
Installing New Leds
Putting the new LEDs in is gonna be just a little bit trickier. the
picture below (thanks to aweirdguy) shows how the LEDs have to face on a
wired controller. the wireless controller is the same for the bottom but
you have to flip them around for the top LEDs. on the bottom of the LEDs
you will see something like this -| .
make sure they match the picture for whichever controller you're doing.
now to solder them on. take out some tweezers and grab one of the LEDs.
again make sure they match or they won't light up. place the LED on one
of the empty spots. now take a little solder and solder it into place. i
used the tweezers to make sure the LED didnt slide over. have a little
patience with this. if for whatever reason the LEDs dont work try to
desolder it and flip it around. if it still doesnt work then maybe you
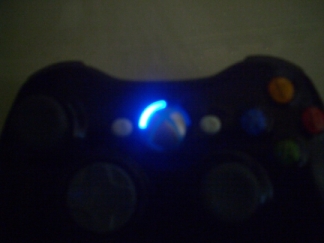
soldered it on wrond. anyway hope you enjoy your controller and that
this tutorial helped you. here are some pictures of my controller. if
you want your controller painted a different color go on my other
tutorial for painting. see ya.