Use at your own risk, this may break your 360, 360 DVD drive and/or PC if done improperly (or if I happen to have made mistakes).
Connecting the 360 drive to a PC
Getting the Hitachi-LG drive detected under Linux and Windows
Dumping the Hitachi-LG firmware from a PC
Dumping the 'forbidden RAM ranges' 0x8002EC00-0x80037300 and 0x8003A000-0x8003A300
Dumping the drive's unique encryption key from a PC
Writing to anywhere in the Hitach-LG drive's memory space from a PC
Forcing the Hitachi-LG drive to execute arbitrary code from a PC
Connecting the 360 drive to a PC
There are two ways to power your drive when connecting it to a PC
1) From the 360
2) From your PC power supply or external 12V mains adapter
Option 1 is easier in the short term but it's not as safe as option 2 and it gets annoying after a while. For option1 do this
1) Connect your DVD drive to your 360 using the 12 pin DVD power cable supplied with your 360.
2) Connect your DVD drive to your PC using a standard SATA cable.
3) Connect the chassis of your PC to the chassis of your 360 with a couple of croc clips
4) Turn on the 360.
5) Turn on the PC.
Step 3 isn't strictly necessary in this case, but it's a very good habit to get into.
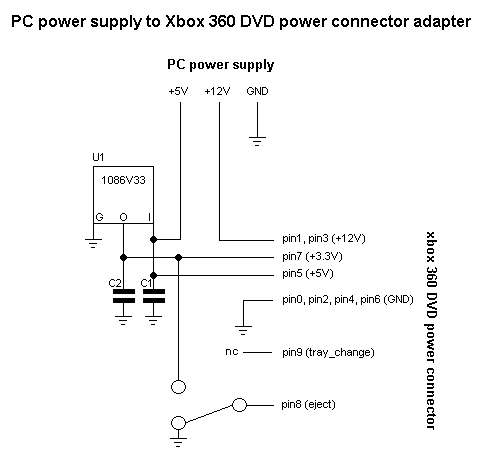
option 2 is more difficult in the short term but is safer than option 1 and you don't have to keep powering the 360 up and down to use the drive. The following circuit will power the 360 drive from your PC power supply.
*** SEE IMAGE ATTACHED ***
It could possibly be useful to mess with the drive's state on a PC and then boot the drive in the 360 without powering the drive down and losing the state. To power the drive from a +12V (or more) external mains adapter requires an additional voltage regulator (7805) to generate the +5V supply.
Note: everything from this point on applies only to the Hitachi-LG drive, not the Toshiba-Samsung.
Getting the Hitachi-LG drive detected under Linux and Windows
This depends on how you connect the SATA signal cable to your PC. The 3 main ways are
1) PATA - SATA bridge board
2) PCI SATA adapter card
3) Native SATA controller
There is one method that I have tested on all three and so I know definitely works. Unfortunately it requires soldering and desoldering. Do this
1) Remove the case from the drive (4 screws)
2) Locate resistor R214. It's in a cluster of 6 resistors between the SATA signal connector and the MN103 MCU (the big 4 sided chip with a million pins)
3) Remove resistor R214.
4) On the DVD power cable, cut back the insulation on the tray_status line to expose the wire (do not cut the wire). If you hold the drive horizontally with the top pointing towards the ceiling and look at the power connector on the back of the drive, then tray_status is the 2nd pin from the left on the bottom row of pins.
5) Solder one end of a 10K resistor onto the exposed tray_status wire
6) Solder the other end of the resistor to a switch between +3.3V and GND (You can get +3.3V at the 3rd pin from the left on the bottom row. GND is available on any of the 4 right most pins on the top row)
7) Before powering up the drive select +3.3V for normal drive operation or select GND for a debug mode that will allow the drive to be detected in Windows, Linux and I imagine any other OS.
Another method that I suspect will work for any type of SATA connection is a firmware patch. I have not tested this, but I know of at least one hacker who has had it working with native SATA. I strongly suspect it will work with PATA - SATA and PCI SATA too. Obviously this requires that you are able to reprogram your drive's flash chip. You need to patch the following code within the Inquiry command handler.
Code:
ROM:00024F6D movbu (word_5BD), D0 ; D0 = packet[5]
ROM:00024F70 mov 0xC0, D1 ! '+'
ROM:00024F73 and D1, D0 ; clear all bits except for (vendor-specific) bits 6 and 7
ROM:00024F75 cmp D1, D0 ; are both bits set?
ROM:00024F76 beq loc_24F80 ; yes, so continue
ROM:00024F78 mov 0xD, D0 : no, so fail
I'd patch the conditional "beq loc_24F80" instruction at offset 0x24F76 with an unconditional "bra loc_24F80" instruction. These offsets are taken from the 0047 revision firmware, these may differ in the 0046 code but the priciple is identical.
If these two aren't an option for you, then the following options are available. You'll have much more of a chance using a PATA - SATA board.
1) If you're using a PATA - SATA board, then I found that simply ejecting and closing the tray during boot was enough to get Linux to detect the drive.
2) If you're using a PATA - SATA board or have a legacy mode on your Native/PCI SATA controller, then you can use the following program to initiate the same debug mode that I mentioned above. This should get it detected in Windows after a restart (make sure the drive doesn't power down) or maybe running a "Find new hardware" instead of a restart (untested).
download source
download binary
3) If your drive is detected in Linux but not windows, then you can boot into Linux and run the following program. Then reboot the PC into Windows (make sure the drive doesn't power down). Windows should then pick it up.
modeb.c
4) Linux users should keep an eye on Protobus excellent efforts with the drive in Linux.
Windows users, during some of my tests with native SATA I sometimes found that windows (XP in my case) would detect the drive and it would appear in device manager, but no drive letter would be assigned. To assign one I had to do "device manager > DVD/CDROM drives > right click on HL-DT-ST DVD-ROM GDR3120L SCSI CdRom Device > Properties > Volumes tab > Populate > OK" (screen shot).
Dumping the Hitachi-LG firmware from a PC
There is a Hitachi debug command that allows you to dump memory from the drive. There are security measures in place to prevent the software dumping of the firmware but these measures are a complete failure (see my full notes for info). The following program will dump your firmware.
memdump.c - hex memdump source for Linux
memdump_win.zip - hex memdump binary for Win2000/XP
memdump_win_src.zip - hex memdump source for Win2000/XP
Linux example:
Code:
$ ./memdump /dev/hdc 12200 8 8000 ./firmware.bin
Windows example:
Code:
C:\> memdump_win e 12200 8 8000 firmware.bin
Simple as that.
Dumping the 'forbidden RAM ranges' 0x8002EC00-0x80037300 and 0x8003A000-0x8003A300
It turns out that these ranges contain very interesting information Again, the security measures to prevent software dumping of these ranges were a total failure. Use the following commnds to dump the entire contents of RAM, the 'forbidden' regions are at offsets 0x2EC00-0x37300 and 0x3A000-0x3A300 in the final dump.
Linux example:
Code:
$ ./memdump /dev/hdc 10200 8 8000 ./ram.bin
Windows example:
Code:
C:\> memdump_win e 10200 8 8000 ram.bin
Dumping the drive's unique encryption key from a PC
This key is used to de/encrypt some of the ATAPI transfer during disc authentication.
Linux example:
Code:
$ ./memdump /dev/hdc 91004F0 1 10 ./key.bin
Windows example:
Code:
C:\> memdump_win e 91004F0 1 10 key.bin
Writing to anywhere in the Hitach-LG drive's memory space from a PC
A combination of Mode Select(10) and Hitachi debug commands allows you to write to anywhere in the drive's address space. The following program allows you to peek/poke single bytes. The same principle can be applied to any amount of data, not just single bytes (see my full notes for info)
pp.c - peek/poke source for Linux
pp_win.zip - peek/poke binary for Win2000/XP
pp_win_src.zip - peek/poke source for Win2000/XP
C:\> pp_win e ABF peek
C:\> pp_win e 804A4B4C poke F2
Forcing the Hitachi-LG drive to execute arbitrary code from a PC
A combination of Mode Select(10) and Hitachi debug commands allows you to execute MN103 code inside the drive. The following program will do this for you. Note: It can take a while to upload the a lot of code.
execcode.c - execcode source for Linux
execcode_win.zip - execcode binary for Win2000/XP
execcode_win_src.zip - execcode source for Win2000/XP
very good read _________________________________________________________ .
XboxXXX V.I.P. Lifetime
Joined: Oct 09, 2004 Posts: 1873 Location: Hampshire, UK XP: 384
Posted: Wed Mar 22, 2006 3:46 pm Post subject:
Nice one! I agree with comment #1
|
All times are GMT |Page 1 of 1
You cannot post new topics in this forum You cannot reply to topics in this forum You cannot edit your posts in this forum You cannot delete your posts in this forum You cannot vote in polls in this forum You cannot attach files in this forum You can download files in this forum