 360 Controller LED Replacement
Published by endless on 2007-03-29
Well I have worked with lcd's in the past, and thought it was time to mod my controller. So I set about gather as much information as possible to do the job. I am going to kindly provide you with all the information, that made this small project fun and easy. LoL
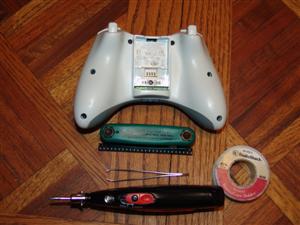
Supplies/Tools needed:
1. Phillips head screwdriver for wired controller.
- Security Torc T9 driver for wireless controller.
2. 0603 leds I recommend buying them from http://www.unique-leds.com"
They range from 24 cents to mid 30 cent range. Far cheaper then mod sites.
3. Soldering Iron + Solder.
4. A pair of tweezers. Optional, for getting the lcd into position for tacking.
Here is a picture of a single lcd. Notice these are
extremely small, and this mod is not for the faint of
heart, but hey your reading my tutorial no worries.

Now you will need to remove all the screws. There will be a hidden screw underneath the serial number. Its in the middle, feel around and you will locate it.
Once you have done this peel that controller apart and set the pcb down. Now look at the middle of the pcb, (green card, with lots of stuff on it) you will notice the small lights, there are four of them.
I will describe the process of floating these leds off and put up the link to a site that shows how its done in a nice neat little video. I tried to create my own, but was to difficult to do by myself.
First heat up the soldering iron, grab your solder, and place a little down on both sides of the led, now heat it up as fast as you can and push the led to the side with the iron when the solder is heated and it will peel off. This takes a little bit of effort, but after you complete one the rest will fall in short order.
Note full credit goes to our network affiliate llamma for this great video.
http://www.llamma.com
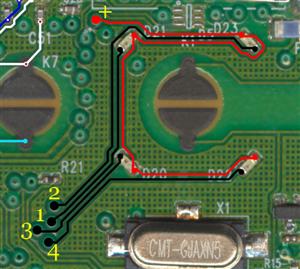
Now these next two photos, that show the polarity of the boards was taken by RDC at http://forums.xbox-scene.com
Wireless controller polarity
Wired controller polarity
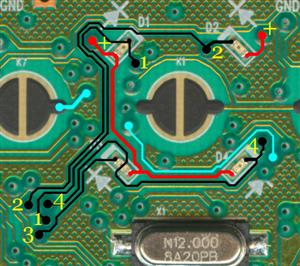
The reason behind these pictures, is the fact that if you follow the other tutorials on the web, they are very confusing and half the time, don't offer a picture showing the polarity. With these its very easy, black is negative, and red is positive.
If you look on the bottom of your lcds, you will see either this -| or a triangle. Now the -| the line points towards negative, while the triangle's point is pointing towards negative. This is how you use the pictures in conjunction with the negative to lay down your lcd's.
I will be honest, I am really rusty with soldering. I've been soldering for years, but even the first laydown of an lcd gave me a bit of a problem. Here is a tip, lay out the lcd on top of the solder points. If a piece of the solder point is sticking up making it a bit difficult to lay down the lcd, go ahead and touch it with the soldering iron. Do this a few times and the solder will round out making this part of the installation process that much more easier.
Now that you have your first lcd ready to go, take your tweazers and push down firmly on the lcd. Take the soldering iron and touch either side of the lcd. This will solder the contact of the lcd to the solder.
Now after doing each one, you will want to check to ensure each lcd works. If you have a wired controller, plug it in and take the backing off the button's that contact the YXAB button's and lay it down. You will see two slots for the bottom lcds, thats the easiest way to tell if you are setting it down right, now press the the button in the center of the lcd's, and if your light glows up you know you have a good conection.
If you have a wireless controller, put the back plate back on and put the battery pack in, and do the same steps as you did above. If the lcd lights up great, if not, try adding a bit of solder to each of the joints, not to much. If still it does not light up, take off the lcd and start the process over.
Now do this for the rest of the lcd's, close the case up. Thats it, once you do a few controllers you will be so proficent at this, that you will not look at this tutorial, except for the polarity pictures.
Tips and tricks
1. Have a clean area with enough light to see what your doing.
2. Do not rush, take your time and ensure you do it right the first time.
3. When ordering the lcd's ensure you prepare for the worst, and snag a few extra.
4. If at any time you have problems, or questions, stop what your doing and hit the forums, or pm me, im on HQ quite a bit. Odds are you will catch me.
If you find this tutorial helpful please be sure to DONATE to become a VIP Member on the entire HQ network. Also, don't forget to hit up the forums, or via private message and let me know.
Endless
Related Link: Xbox 360 Case/Hardware modding Dicussions
|
|