 Street Fighter Anniversary Joystick Xbox 360 Mod
Published by forahobby on 2006-09-09
Tutorial by: DM / GamersReports.Com
We are coming to you today with a project by GR and our friend purbeast from http://www.360gamesaves.com. There is no quality joystiq out for the XBox360 at this point, all you can use is that DOA4 stick, and it pretty much stinks. Worry no more! You can now use this simple method to wire any joystiq into the Xbox360! Check it out! Remember, you can click on the media that goes with this article for high resolution versions of all the images and diagrams!
When I first bought DOA4 I realized how much it sucks to play fighting games on a control pad, especially the XBox 360 controller. The D-pad just doesn't cut it for fighters. I then saw the DOA4 Hori stick, and that stick looked like crap to me.
Then I heard Street Fighter 2 was coming out on XBLA and I knew I had to find a solution quickly in preparation for SF2. Then out of nowhere I remembered that I built a joystick out of arcade parts and the inside of a PSX controller for my PSX back in the day. I then thought why not use my SF:AC joystick as the basis for this, and use a wired XBox 360 controller for the guts. So that's where this tutorial begins.
Required Tools & Equipment
- Wired XBox 360 Controller
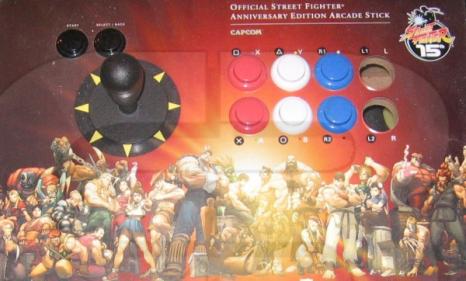
- Street Fighter Anniversary Collection Joystick
- Soldering Iron
- Razor Blade
- Wire
- Small Phillips head screw driver (for the controller)
- Normal sized phillips head screw driver
- A lot of patience
Go on to the next page to start the instructions, keep in mind you need to be at least a novice in soldering to complete the project, but that is not hard to learn.
Where you need to Start
Below is a picture of both the XBox 360 wired controller and the SF:AC joystick, which is where you need to start. (Note that I took out the L/R buttons from my SF:AC joystick because they did nothing but get in the way when using the controller. I play fighter that use 6 buttons max so I took the last 2 out because in SF:AC, all they did was diagonally mirror the black/white buttons).

The button mapping for this project is as follows, with the SF:AC joystick buttons first, pointing to which XBox 360 button they correspond to.
A ----> A
B ----> B
Black ----> Right Bumper*
X ----> X
Y ----> Y
White ----> Left Bumper*
Start ----> Start
Select ----> Guide Button*
Up ----> Up
Down ----> Down
Left ----> Left
Right ----> Right
There are only 3 buttons that do not match up, marked with a *. The Black/White buttons are pretty self explanatory because there are no Black/White buttons on the 360 controller but instead are the bumpers. I mapped the Guide button to the select button because the Guide button is pretty important for the 360, and the Select button is pretty pointless on the 360. Also notice the L/R buttons aren't mapped at all because I took my other 2 buttons out, but as described before, they are not necessary at all for the majority of the fighters.
The first part of the project is to open up the XBox 360 controller. Turn it over and you will se 6 screws. Unscrew them with a smaller phillips head screwdriver. You may then try to take it off and notice it won't budge. That is because there is a screw hidden behind the white barcode stick. Push your finger over the sticker to feel where the screw is, and poke through the sticker with the screwdriver and remove the final screw. The two sides should slide apart with ease. Here is a picture of the controller with the back removed.
Now take the SF:AC joystick and turn it over. There are 10 screws on the bottom that you need to unscrew. They are the screws that are on the edge of the bottom. The longer edges have 3 and the smaller edges have 2. You will see 4 big screws inside the rubber pads on the bottom of the joystick. You do not need to do anything with those. Unscrew the 10 screws with your phillips head screw driver. Once you unscrew them all the bottom will pull right off and you will see the picture below.
After opening the SF:AC joystick, I removed ALL of the wires and pieces that had to do with the XBox 1. The green board you see there, as well as the microphone jack, are screwed on with phillips head screws. You can unscrew those easily. I also left a mark at each connection to remember what wire went where, just in case I ever put it back to work with XBox 1. After removing the connections, leaving a label, and removing the board and microphone jack, it looks like the following.
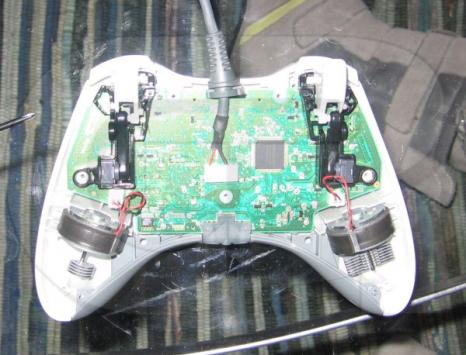
You now have the 2 parts ready. Go back to the 360 controller and get the board out of the casing. I quickly removed the rumble packs. They are the little heavy round things on the 2 arms of the controller. There is a white plug you can unplug to disconnect them, removing them from the controller.
Once that is done, just pop the board out of the casing. You may have to push on the analog sticks to get them to go through the hole they are coming out of. It's very simple though and you will see what I mean once you do it. Once you have the board out of the casing, just pull towards you on the 2 analog sticks and they will just pull right off with no problem.
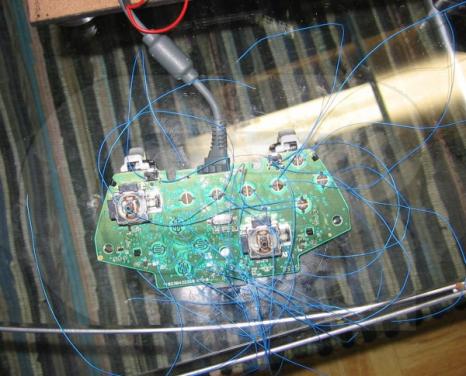
Your controller should then look like the following picture.
Note how I have marked each solder point in that picture. At each of those points, you will notice there is some black rubbery type coating. At this point you will need your razor blade. At each of those points, you must gently and carefully scrape that rubber away. You only need to scrape enough away to expose the metal that lies underneath. You do not need to completely scrape those half circles, but just a portion of it that will expose the gold metal below it.
Make sure you do this for every point that I have marked on the diagram because you will be running a wire from each of those points. The only 2 buttons you do not need to scrape any rubber away from are the Right/Left bumper buttons. They have metal exposed already you can solder directly to, and you can see that from the picture.
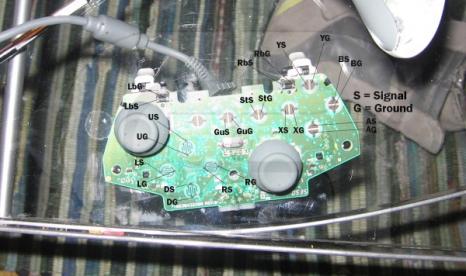
Now below is the inside of the SF:AC joystick labeled with the corresponding solder points where you will run a wire from the XBox 360 controller to the joystick.
You will notice it has exactly the same amount of points as the inside of the XBox 360 controller does. Basically you are just going to run a wire from all of the points on the controller to the corresponding point on the joystick pin.
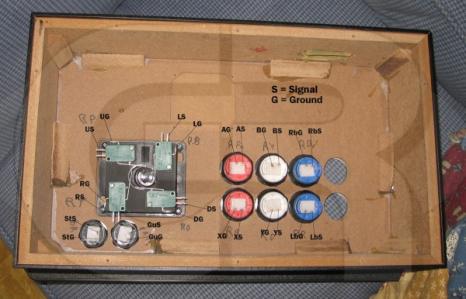
So now begin the wiring. I recommend attaching wires to the controller first before you start connecting them to the inside of the joystick. You will need a total of 24 wires, of whatever length you choose to fit where you mount the inside of the controller. Below is a picture of the controller with the wires soldered to the points.
It looks a little sloppy because they are all the same color, but hey, it works so I'm not complaining.
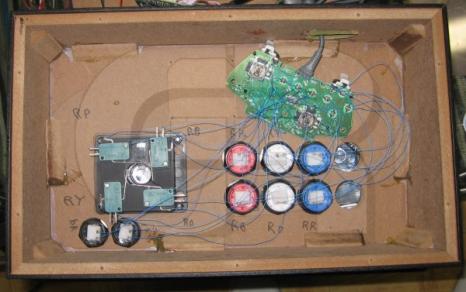
With some time and patience, and a little bit of soldering skill, you then want to connect the wires to its matching part on the joystick, as shown above in the diagrams. Soldering to the pins on the buttons inside the joystick is a piece of cake, and even a 4 year old could do it.
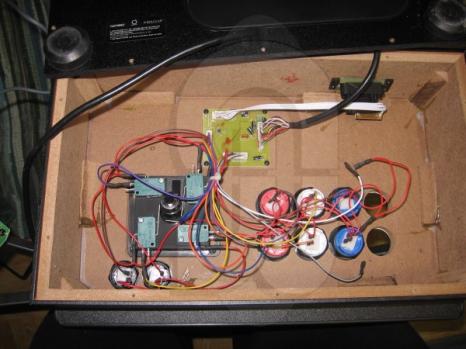
Once you have it all soldered together it should look like the following.
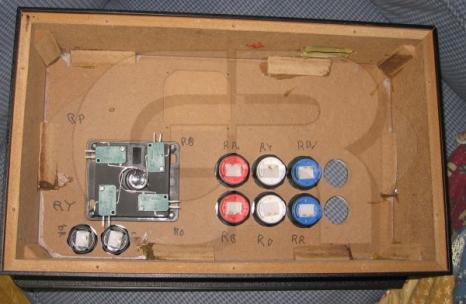
Test it out by plugging the controller into your 360 in the dash and just testing out every button. I actually would plug it in after I soldered every button just to make sure I didn't screw something up, but in the end all 12 buttons were working flawlessly.
I currently have the wire of the controller going through the microphone jack on the controller. You can do that however you want, as well as mount the inside of the controller however you want. I personally do not talk while playing 1v1 games because it typically consists of people talking smack the whole time which is nothing but annoying.
However I think whenever I have more time, I am going to mount the inside of the controller so that the microphone jack on it is going out of the same place the microphone jack was for the original joystick. That way just in case I want to talk to someone I can.
Well there you have it. You now have a good joystick for your XBox 360 and don't have to use the stupid D-pad or DOA4 Hori one either. I look forward to seeing you on SF2 on XBox Live :). - purbeast
Tutorial by: DM / GamersReports.Com
Related Link: How To Make An Xbox360 Arcade Joystick
|
|